Pages

Showing posts with label Halloween decorating. Show all posts

Sunday, October 20, 2019

a Halloween tablescape with a mystery book theme


I couldn't resist tackling at least one Halloween post this year, especially when Liz Vice gave me a sweet shout-out on Facebook, about all my old Halloween parties of yesteryear. 
And it made me smile.  
Once upon a time I used to be a Halloween maniac during this season. And since I woke up one day recently-- with a rare feeling of normalness in my chest, I decided to let my creative juices get going. 

One little post that only took some simple grocery store flowers.


I hope you enjoy it.


A mystery-book themed dinner party with a library card invitation :


made here


With books being the center of attention at this table, I envision wonderful conversations about the latest books being read by fellow guests. And the best part of book conversations is how a simple topic about someone's favorite author or book can result in so many surprising facts about fellow readers.


One of my most sentimental buys I've ever gotten from a used bookstore was a big box filled with old Nancy Drew books for twenty bucks. I was so excited. As a little girl I loved these mysteries and I still remember that first book I carried to the librarian to check out: The Secret of the Old Clock.

oooooohh I couldn't wait!
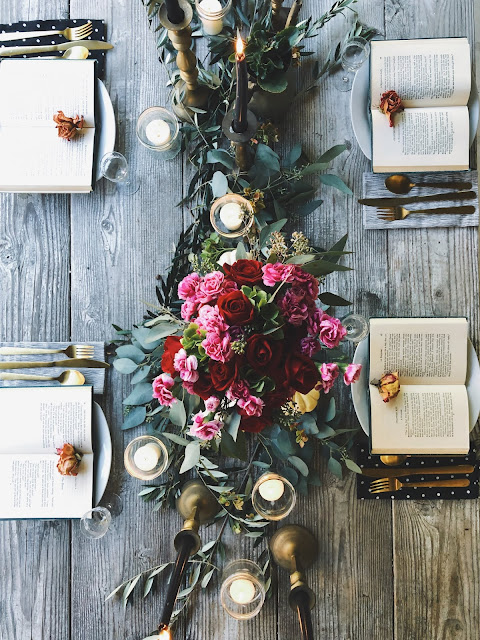


Personally I love the idea of incorporating books into a table setting and especially for Halloween, mystery books are perfect choice. I've seen Joanna set tables with books opened and placed underneath each dinner plate for a creative touch, but I prefer opening them up on top the plate so the words can be seen.

One creative idea for a place card is to write each name on a bookmark and display it inside the open book.


Or since it's a mystery theme you might place a magnifying glass over each name card.


Over time I've collected brass candlesticks and vases from my thrift store visits and there's nothing better for a Halloween table than old, scruffy-looking brass contrasted with black candles.


I'm also a believer that you can never have too many candles when it comes to creating atmosphere. And whenever I buy the lemon curd from Trader Joes I save the jars to use for my votive candles. I recommend adding a layer of sand or water at the bottom of the jar if I plan on letting them burn for hours, so you don't end up with dried, thick wax on the glass


For this centerpiece I used a piece of green floral foam wedged inside and just filled it with red roses, carnations, fresh eucalyptus, and lime green hydrangeas.


Olive branches from my tree and fresh eucalyptus are down the middle of the table. For continuity I use the same hydrangeas from the garden to tuck into the arrangement in the vase and around the candles..


These mix and match napkins came from TJMaxx.


I really like this gold silverware set from Target.


Roses from an old arrangement I finally threw out found a perfect home.


Living in Southern California means you can still have dinners outside in October...which is nice.


Who knows?
Maybe one of these days I'll throw a big mystery book dinner party and when I do, you'll be on my guest list!


xo
Leslie


I'm sharing this post with friends:


Friday, October 12, 2012

8 Halloween decorating tips for outdoor space…

DSC_0579copy2

Having a Halloween party this year?

Here’s a few things I did to transform our outdoor space. This is where we set up our beer & wine bar and put the coffee and dessert table. And I’ve noticed that the guys always end up outside no matter what the weather…so I like to make it comfy.

1. I used orange and black burlap to create colorful walls

If you’re going to be entertaining outside, it’s nice to provide a sense of enclosure for your guests. Here in California, it’s a still warm enough to use our patio (there aren’t a lot of porches where I live) during Halloween parties, and I like to put up my orange and black burlap panels because they add a feeling of coziness and some festive color.

Here’s a photo I took while I was still putting up decorations. It looks a bit bare, but you get the idea.

Want to know how easy it was?

DSC_0522

We used simple PVC pipe for “curtain rods,”measured and cut them, and attached them to the patio (actually my Dad did this part).

Here’s a close-up of the hardware.

DSC_0523DSC_0524 (2)

For the panels: Measure and cut the burlap pieces so that they’ll puddle on the ground. Run a stitch at the top of the burlap and simply slip the burlap over the PVC pipe.

DSC_0495copy

DSC_0582copy

Instant Halloween curtains! Because of the location of our fountain, I couldn’t completely enclose our patio, but this is what guests saw when they stepped outside.

DSC_0579copycloseup


2. I covered my patio cushions with orange felt.

I used safety pins when I attached my orange felt to the cushions. I placed each cushion on top of the fabric, measured and cut. The safety pins are all in back. Believe me, no one will ever look behind the cushions and see the safety pins and after the party, you simply remove them and voila! Everything’s back to normal.


DSC_0586copy

3. I decorated with cornstalks

4. I replaced my white light bulbs with orange bulbs.

 I ordered these bulbs online from Party Lights.com.

DSC_0589copy

5. I hung jars of candles from trees

DSC_0569copy

6. I tucked black tulle into Fall garlands that I hung overhead…

4031498126_5f745ca65ccopy

via: countryliving.com

7. I tied black tulle around the light strings using this photo as my inspiration.

DSC_0562copy

8. I put tombstones and props into the garden area …


and when I was done, I had one of these:

162622236514079765_sxQsh9Ze_cfrostmeblog

via: frostmeblog.blogspot.com

Not really. But I wished I had one of these adorable drinks. I don’t even care what’s in it,

I just love that darn broom stir-stick, don’t you?

Well, did I give you a few ideas for your own porch or patio? I hope so. Let me know what you think, I’d love to hear from you.

263531015664876245_sO5B2clv_c

via: Michelle Church; Pinterest

Bye for now darrlings,

Leslie

Psss…I’m linking up here for a good time!


Monday, September 24, 2012

Halloween decorating with black crows

DSC_0481copy

In case you’re wondering, the letter “C” is for Crows.

Well, at least during Halloween.

DSC_0109copy

During the rest of the year this gold letter stands for ‘Create’ and it hangs on my dining room wall with my collection of framed vintage prints. This is the BEFORE photo of my dining room wall last season… before I transformed it into a cool Halloween art gallery of black crows.

6161463436_bed26b9a40doctormacro

via doctormacro

Don’t you just love those screeching black birds? They add that perfectly creepy touch at Halloween, especially when you cluster them in large numbers.

6160885421_47b5e83118

So when I saw this package of twelve crow silhouettes by Martha Stewart, I bought it without knowing exactly what I’d do with it. And then it dawned on me. What about turning my dining room wall into a gallery of crow art? After all, everything was already there, the framed art work and the nail holes…

All I needed were the crow pictures.

DSC_0520copy

So here’s what I made using Martha Stewart’s crow silhouettes.

DSC_0524copy

It was so easy.

DSC_0299copy

I simply cut white poster board to fit inside the framed artwork I already had hanging.

DSC_0304copy

And I covered each white poster board piece with old book pages…

DSC_0302copy

But first I decided to draw lines on the poster board to use as a guide. I wanted the pages to appear straight, so l lined them up, then used double stick tape to attach them. 

DSC_0599copy

After the poster board was completely covered with book pages I attached a single crow silhouette in the center using the adhesive dots that are included in the package. And voila! You have instant Halloween art for your haunted house. The final step is attaching the poster board to the front of your glass, and again, I used tape.

DSC_0480copy copy

What do you think? If you’re interested in how I made the doll head chandelier, you can Click here. But back to the crows.

DSC_0365copy1

I added a few more birds here…

DSC_0415copy

and there…

And then I made this Crow’s Nest using my pot rack.

DSC_0620copy

Do you like it? Here’s how I did it:

I sprayed some branches black and attached them with wire. Then I added burlap pieces layered with cheesecloth and dried moss. And of course, lots of crows. The birds were a little tricky to attach to the branches because of the odd angles so I used wire and lots of black masking tape over their feet. As a final touch, I tucked a few small flashlights inside the burlap and on the night of the party I turned these on. In the dark, these lights added a spookiness to the crow display that was perfect!

Well, the countdown to Halloween has begun for all of you Halloween party planners. I hope I gave you some ideas you can use…let me know how it’s going, I love to hear about party details.

imagesCA25TPZO

In the meantime, I’m linking up here:


xoxo

Leslie


Tuesday, October 25, 2011

How to decorate your chandelier for a Halloween Party

DSC_0292 copy

Doesn’t this picture send shivers down your spine? This is a close-up picture of my very creepy, haunted chandelier.

Are you decorating for a Halloween party? I’m going to show you how to transform your dining room chandelier into a perfect fixture for your Halloween festivities. Your adult guests will love it, and it’s amazingly easy to create considering how dramatic the end results are.

Depending on the size of your chandelier, you will need the following items:

  • Dolls from your neighborhood thrift store. (I used six)
  • 1-2 cans of cheap white spray paint.
  • 3-4 yards of cheesecloth
  • fishing wire.

DSC_0276 copy

I covered the doll’s hair, removed the clothes, and sprayed the exposed doll parts with a can of white paint. For a ‘haunted look,’ I think the dolls look best in white dresses… but only one of my dolls had one.

The other doll heads came from miscellaneous dolls that I had picked up at a thrift store. I simply detached their heads and sprayed. I wanted these dolls to be hairless.

DSC_0275 copy

This is the “BEFORE” shot of my chandelier.

As you can see, my chandelier has six arms. After removing the shades, I decided to remove three bulbs and slip doll heads in their place. I kept three bulbs intact to provide some lighting, but you could remove all of the bulbs, it’s really a personal choice.

TIP: Once you put the doll heads on the “candle” they may be sitting too low in the candle cup. In that case, you can prop them up with a piece of masking tape. Simply scrunch the tape beneath the doll’s neck so that the tape is not visible.

DSC_0363 copy1

This is the “AFTER” shot of my haunted chandelier

Step One: Begin by cutting pieces of white cheesecloth approximately the length of your chandelier. Don’t worry about measuring, since the cheesecloth is going to be stretched and ripped to achieve the final look.  When you drape each piece, take time to use a fork or pair of scissors to help you pull the cheesecloth apart; don’t cut it, simply pull and stretch the cheesecloth. You could use your fingers to achieve this look as well.

DSC_0278

The photo above shows the cheesecloth before it’s been pulled apart. Each chandelier arm gets a separate piece of cheesecloth on it to begin the draping process. The more transparent each layer is, the better.

DSC_0279 copy

Step Two: Continue to add layers and shred until you get your desired look.

DSC_0293 copy

DSC_0341

Step Three: Attach the three dolls on the top of your lighting fixture. 

Once your cheesecloth layering is done, attach the three dolls onto the top of your lighting fixture. My dolls could  actually “sit” on top because of the shape of my chandelier. Use fishing wire to tie.


DSC_0321 copy

Step Four: Drill a screw into the top of each remaining doll head and Attach fishing wire to the screw. Tie each doll head to an arm of the chandelier.

You should only be able to glimpse them hanging at the bottom.

I used three doll heads because that’s all I had. As one last touch, I added a few spiders to the cheesecloth and …voila! You’ve just created a scary- looking chandelier that is ready to cast an eerie glow over your ghastly looking guests. Now have a sip of this yummy Witches Brew and enjoy!


 And me? There’s no time for rest,  I’m still decorating my spooky old house so stay-tuned for more Halloween photos and ideas to come.

Thanks for stopping by…


Related Posts Plugin for WordPress, Blogger...