Pages

Saturday, February 25, 2017

How I transformed a plain door into a Farmhouse door


Hello friends. I'm traveling today but I wanted to stop in and share a DIY project I did awhile back.

I'm finally getting around to organizing my pictures and even though I only have IPhone ones, I think the project is worth sharing because it's such an inexpensive way to add a trendy farmhouse door to your home.

 Because our original door was damaged I bought a plain, inexpensive one from Home Depot and decided to transform it into something that would fit better with our beach cottage look. Although I didn't get a "before" photo of the door this one looks identical except for the placement of the doorknob. Ours was on the opposite side.

Saving space

The reason I decided to change this door out was because it opened into our tiny laundry room, cutting into valuable space. By replacing it with a door on a slider, it makes the laundry room more functional until we can get around to tackling this entire space.

For this project I used basic pine 1x4s and planks leftover from my bedroom walls.

First off, I cut and added the pine on all four sides.

Looking at the door from this angle you can see the depth in the middle of the door that I created with these 1x4s. 

After playing around with the faux planks
(strips cut from sheets of plywood)
inside this space, I figured out that my design would work.


My design required a middle piece.


Once the center piece was cut and nailed down it was time to add the planks.

I decided to add glue before nailing down my planks. But first I had to measure the space and decide how wide these planks should be, I decided on six.

Once the bottom planks were added I used wood filler for my nail holes and added a base coat of white primer.

Now came the tricky part (for me at least)
 It was time to cut my angles for my "X" on the bottom.


Close enough. After the wood filler it was ready for more paint.

Front side done.

To finish the back side I turned it over and covered it with the planks minus the middle piece. Same process, using wood glue and nail gun.


Issues with adding thickness to door

I really wanted the "planked" look from inside the laundry room but I was getting worried about the thickness I was adding to the door. Here's a side view:


I had ordered barn door hardware from a different company and when it arrived not only were the measurements all in the metric system---but the pre-drilled holes didn't line up with our studs. It really added to our concern about the weight of this door. 


Back-side Before

All done and ready for paint.

Before


After

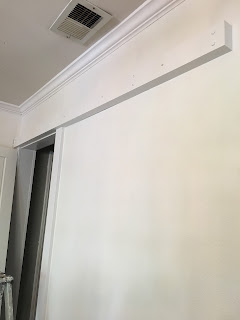
The lighting wasn't great when I snapped this picture but if you look closely you can see the 2x4 over the doorway that Jim put into the studs, then we attached the sliding door hardware into this 2x4 for added strength.


I painted it white to blend into the wall:


I'll be back with better pictures.


Also--I'm thinking it still needs a black rustic door handle.
What do you think?
Yes or No?


xo
Leslie


i'm sharing this post with these friends:


Sunday, February 12, 2017

Salted chocolate lavender cupcakes with honey coconut cream and some exciting news!


Hello friends!

Today I've here with a delicious recipe to share with you but I've also got some exciting news too--a perfect little announcement for this new year.

Let's begin by acknowledging that today is an official 'first' for me.

Yep, not only is it my first-ever vegan recipe on my blog, but it's actually the first time I've made a vegan dish period.


So of course it had to be a dessert.

But wait-- here's the exciting part. 

I've been asked by my 24 year old to contribute a recipe-of-my-choice for his new organic food and beverage website and blog that's up and running, called Bodhi Organics.  

Although the company is  very much in its infancy --with more products on the way-- Patrick's getting encouraging traffic from his Instagram and Facebook account and who knows, maybe from a few of his Momma's friends too.

(wink-wink)


a recipe with a poignant back-story

When it came to choosing my recipe I knew immediately that I wanted to share something from the kitchen of Elizabeth Kirby, the esteemed foodie, photographer and stylist of the enormously popular blog, Local Milk.

I've been a follower of her exquisite writing and stunning imagery for years, watching her from afar as she navigated through vulnerable single life, fell in love and now has a new baby. So in a way, this feels like a serendipitous little match; introducing my son's budding dream with the recipe of a someone whom I feel oddly maternal. 

And because life is saturated by layers of stories, I should also mention that this delicate, lavender-infused recipe was created by Beth for her dear friends, Tiffany and her fiancĂ© Kappel. And that tragically, Kappel died in the months that followed their visit with Beth, making this recipe even more infused with tender love. 

So here we go: in addition to this poignant back-story this cake itself is the bomb! Incredibly moist and flavorful, believe me, J had absolutely no idea he was eating a non-dairy, gluten-free product.

Ingredients:
makes about 12 cupcakes (I got 15)

2 cups AP Gluten-Free Flour
1 teaspoon xanthan gum
1  1/2  teaspoons baking soda
1 teaspoon kosher salt
2  1/2  teaspoons dried lavender, ground to a powder
1  1/3  cup granulated cane sugar
1/2  cup unsweetened cocoa powder
1  1/3  cup hemp seed milk (can substitute almond or coconut milk--I used coconut milk) room temp
1/2  cup + 2.5  tablespoons melted coconut oil, room temp
2  1/2 tablespoons apple cider vinegar
2  1/2 teaspoons vanilla extract

Frosting:
2 cans full fat coconut milk
1/4 cup raw honey (or sub agave, about 3 tablespoons for honey to make it pure vegan)

Instructions:
1. Refrigerate the cans of full fat coconut milk the night    before or at least 5 hours before using. They need to chill completely for the frosting.
2. Heat oven to 350 degrees. Line a 12 cup muffin tin with cupcake papers. (Elizabeth lightly greases hers with a non-stick spray).


3. In a medium mixing bowl whisk together the flour, xanthan gum, baking soda, salt, lavender, sugar and cocoa powder to combine thoroughly.

In a separate bowl combine the hemp seed milk ( I used coconut milk) coconut oil, vinegar, and vanilla. It's crucial the milk not be cold or the coconut oil with solidify.


Pour the wet ingredients into the dry ingredients and mix with a wooden spoon to thoroughly combine.


4. Fill each cupcake tin with 1/3 batter, and bake for about 18-20 minutes or until a toothpick inserted comes out clean. It's shouldn't be wet.


5. Allow cupcakes to cool completely before frosting or it will melt.

6. While cupcakes cool make your frosting. Turn your chilled cans of coconut milk upside down and open them with a can opener. Pour out the liquid. Scrape the solids left into the bowl of a stand mixer.


I added honey to the coconut milk mixture

Whip with the whisk attachment until light and fluffy on high, add the honey or agave, and continue to whip thoroughly. Alternately you can use a hand-mixer.


Side note: I got lazy and tried using only my hand mixer but it definitely didn't produce enough 'whipped' texture- I needed my standing mixer for this topping.


7. Frost the cupcakes with the whipped coconut and garnish with a few lavender buds if you like the taste

 (otherwise skip because the lavender buds can be a bit
strong)


Notes: I also tried a batch with regular whipped cream and if you're diet allows, these were amazing too.


If you love the scent of lavender this is your recipe. Crushing the tiny lavender buds filled my warm kitchen with this calming, aromatic scent, it felt like an added treat.


I don't know about you but I've realized that aging well--with wonderful skin and a strong body depends on what I put in my body. And I've really noticed when I eat cleaner (less processed food) and drink my Matcha green tea, I just feel so much better. 


If you feel similar and you like recipes like this one, stop by and visit Bodhi Organics on Instagram or the blog, for more recipes and tips on a health and fitness.

Or just stop by and say Hi to Patrick. 


The website is still being tweaked but I still wanted to share it with you because you've always been so supportive. And it's so nice have you--my readers--be part of this endeavor from the beginning.


xo
Leslie


Sharing this post with friends:
Monday Social
Silver Pennies Sunday Link Party
Coastal Charm Show and Share
Amaze Me Monday
Inspire Me Tuesday

The Scoop
Grace at Home No. 237

Wednesday, February 8, 2017

Ideas for your Valentine table you will fall in love with

Are you planning a Valentine's dinner this year?


When it comes to planning a Valentine's dinner I'm a big believer in creating a special ambiance. Yes, delicious food is important, but when I'm planning a table it's really my way of expressing my feelings for my guests. 

Whether your dinner will be casual or formal or well-planned with a theme, taking a little time to add a spark of
 je ne sais quoi to the table is a way to say

...hey, you're really special to me.

After all, that's what Valentines day is all about.

With Valentine's just around the corner, I thought I'd share a few of my favorite Valentine creations, just in case you're in need of some inspiration. 


Here's one of my all-time sentimental favorites---and yes, I spent way too long making these, but I couldn't help myself.

Do you remember these too?


They were called Cootie Catchers when I was young and I have so many warm, fuzzy feelings about these I decided to create a Valentine version for our annual dinner party a few years back.
Instead of using colors and numbers in the spaces I chose images from romantic movies. Since these were made for the husbands at our table, the opening line was,

Which Leading Man are You?

In place of a fortune to read at the end of the game, I wrote a trivia question having to do with the topic of Valentine's day and romantic movies. And each guest had to answer it for a prize.
The funniest part of this whole game was trying to teach the men how to work their Cootie Catchers. Apparently it takes a lot of coordination. :)


How did I make these?
Wish I could provide a tutorial, but I had to watch this
You Tube video by Heather Hinchliffe Rode .  Once I found my images I copied them, then cut and pasted them old fashioned way.

These Cootie Catchers were part of my Vintage Valentine Dinner Party and in keeping with this theme I made a placecard based on the old paper bag 'mailboxes' we used in grade school to collect our valentines.


 I bought the plain brown miniature bags at Hobby Lobby.


I bought some paper supplies and decorated the bags putting each guest name on the front. Then I slipped a box of candy hearts inside each place card.


I still remember how excited I was to go through my lumpy bag and look at all my classmate's valentines. You too?

Here's a larger shot of this table.


I think I used a piece of red cloth I had and simply folded it over--no sewing--to make my table runner. And while I prefer to use real rose petals these fake ones worked fine.

 I also made some red tissue pom poms to hang over the table for a little whimsy, and these are so easy and inexpensive to make.

Here's a nice little tutorial if you're interested:
How to make tissue paper pom poms


And now for a little romantic movie inspiration:

Recently one of my readers asked me if I would be sharing a Valentine tablescape this year and this little question was enough to inspire me to come up with a creative theme for my readers.

Since my husband's favorite romantic movie is Casablanca, I decided to use this as my inspiration and here's some ideas I came up with for my table:

Casablanca Inspired Tablescape


1. A runner made of sheets torn from an old music book I found in a thrift store.

I used double stick tape to attach the pages.


Music sheet runner

(inspired by the famous song of Casablanca, As Time Goes By)


2. I gathered up some small vintage-looking clocks


3. I painted a thrift store globe in black chalkboard paint and wrote out this famous quote uttered by Humphrey Bogart:

"of all the gin joints in all the towns, in all the world,
she walks into mine."

4. I made this Casablanca themed placecard:

I found this miniature passport in the scrapbooking section of Joann's Craft Store and rubbed it with dark wax and simply added a name inside the cover.


5. I used real palms underneath the silverware for atmosphere.


6. I put roses into little bottles

7. and used old books for height


Casablanca Table Setting


8. I added old brass candlesticks


9. And finally, I used these wonderful hand-made napkins that my talented friend Carol gave me when we recently met in person. Don't these add a touch of charm ? She used stencils and chalk paint to rub numbers into a set of cotton napkins and the minute I saw these I instantly knew I had to use them for a special table.

Thank you Carol, home-made gifts are such a labor of love.

Well that's it for now my friends.

Sorry for such a picture heavy post.... but I do hope I gave you some ideas you can use for your own special occasion.


Thank you so much for visiting today,

xo
Leslie


Related Posts Plugin for WordPress, Blogger...