Pages

Monday, August 29, 2016

The quirky charm of vintage portraits


Well, I’m done.

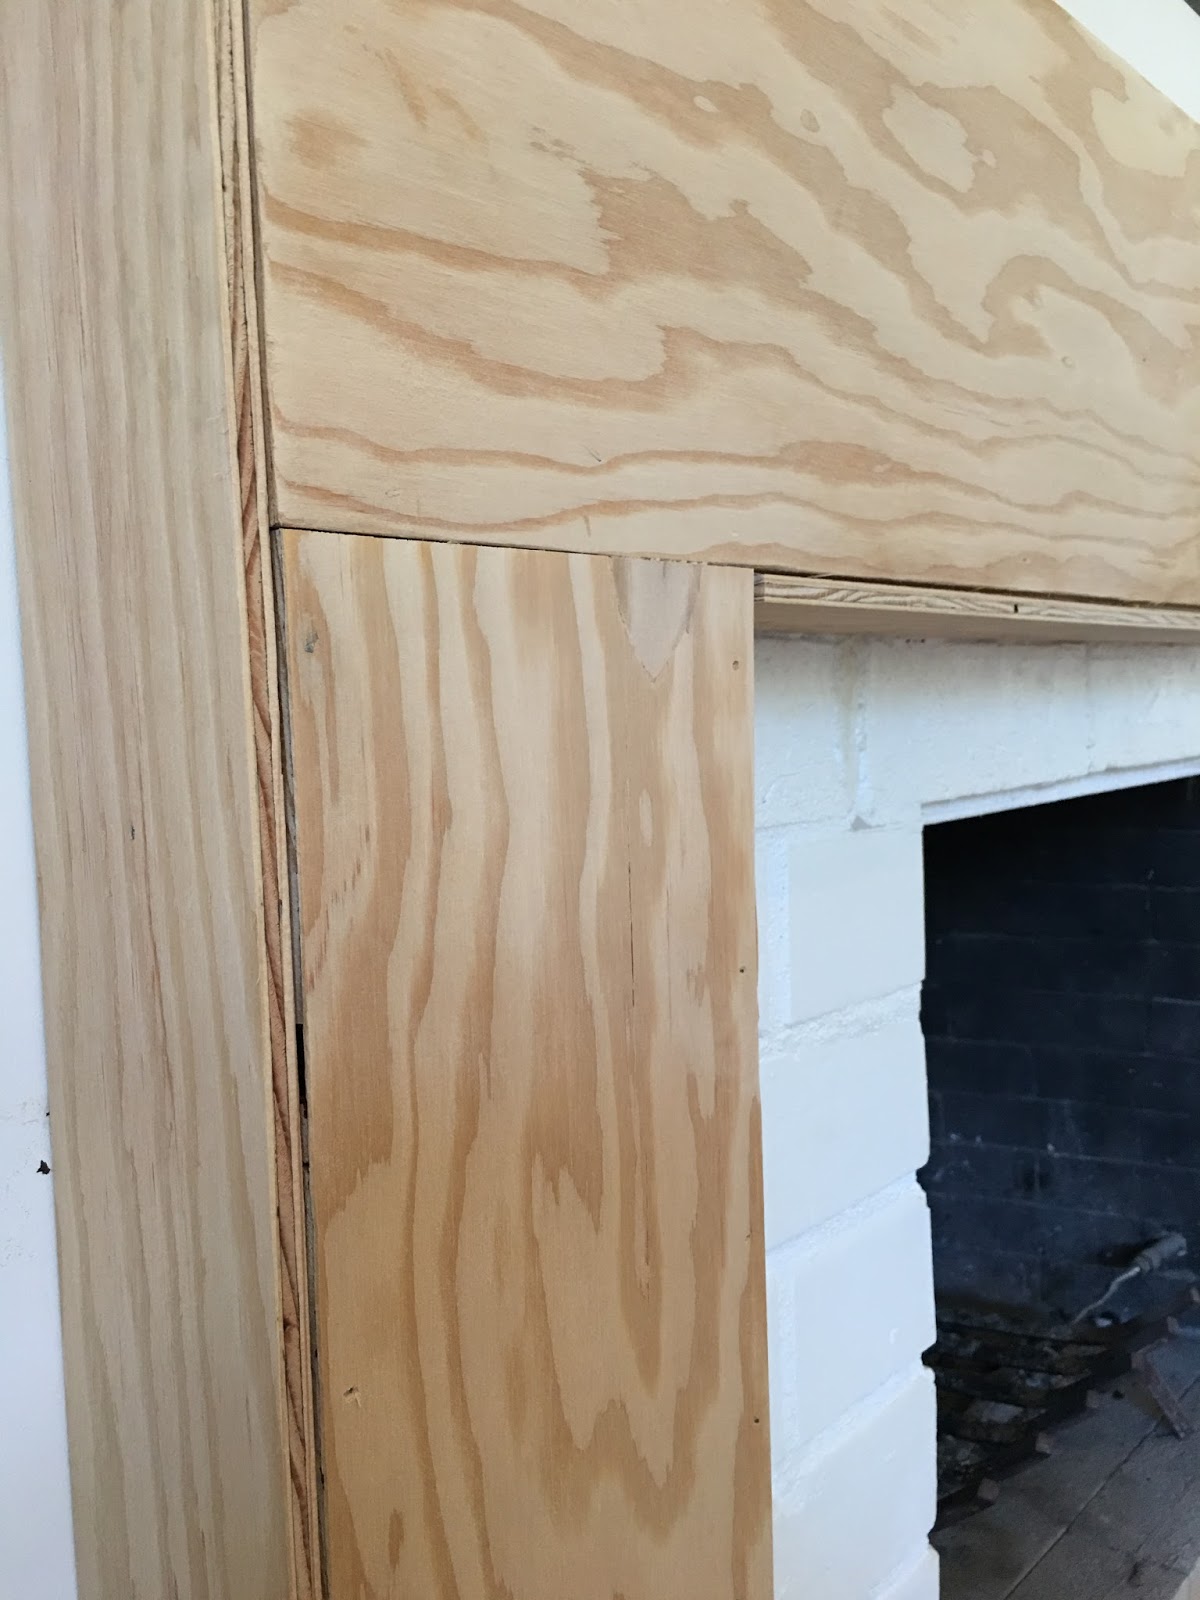
This morning before I left for my yoga class--I finished shooting nails into the very last shelf and now it’s official; my matching bookshelves are finally done!
(Well almost, I still have some touch up paint but no more construction for now)
—Hallelujah!
I’ll have some pictures to share soon but today I decided to take a break and do something I haven’t done in a while...
grab my nice camera, take some pictures and do a fun post on a topic I love.

I've always had a thing for quirky, old portraits of interesting--even peculiar-- looking people. And everywhere I go I keep an eye out for them because I like the charm they inject into an otherwise serious space.

Especially when you put them next to a modern or industrial piece.

I found my latest oil portrait in a thrift store right under a pile of cheap frames and it was only a few bucks too.

(VERY rare for around here)

I recently had it in my upstairs bathroom, similar to this one:
Have you ever considered putting an oil portrait in your bathroom?
Well after several months I noticed some signs of water spots on the canvas, and even though I paid a whole $8.00 for my thrift store buddy, yesterday I moved him to my kitchen nook wall.


Do you have a gallery wall in your house?
Whenever I add something new to it I end up changing everything around. Sigh. It always takes longer than I think.
Here it is next to my giant (32 inch tall) metal letter E and my modern graphic print.


If you're like me and you like the idea of having a stodgy looking character from the past hanging on your wall, only you don't know how to begin, it's pretty simple.
OneKingsLane recently gave some design ideas that are helpful.
You can go bold with a large statement portrait (pricey though)--and in this case--that's all you need:

In my opinion, the reason it works so well in this room is because of the casual, airy vibe. And that striped animal rug---I want one!


I love this serious looking woman next to all the lush textiles and bold graphic print.
One stodgy man+lots of black and leather
=ultra cool, modern vibe.
Doesn't this lone vintage man add a retro, artistic feel to this bedroom? 

Or ,you can integrate your vintage portrait into a gallery wall like I did. 
Here's an idea I love, clustering similar themed pictures together--in this case ocean landscapes-- creates a cohesive look but that also takes more time and patience as you build your a collection.

Before I go here's a few portrait sources you might check out:

  • If you like portraits but are interested in a female, here's one source I found on Pinterest.
  • Believe it or not I haven't shopped for art on Ebay yet. But Emily Hendersen wrote THIS guide to buying art on Etsy you might find helpful.
  • The talented Emily Clark shared her favorite source for Lady portraits: HERE>

But in the meantime, when you're traveling through beautiful areas, don't forget to stop at random thrift stores...you might get lucky.


What are your favorite sources for art ?

xo
Leslie


I'm sharing this post with theses friends:


Tuesday, August 16, 2016

My DIY Cottage-Style Fireplace Mantel.... Reveal!


Ahhhhhh..........
That my friends, is a deep, satisfying sigh you're hearing through your computer screen.
That's because today I'm checking off one of the time-consuming projects I've been working on this summer and I'm pretty happy with the end result.
My newly made mantel finally brings an end to the fireplace transformation in this house.


These pictures give you an glimpse of the 20 month process, showing you the original wall (top left), the red brick we uncovered beneath the drywall and added to, and the subsequent paint and design of the entire fifteen foot wall.

If you're new to this blog and you want to see Part One of this DIY mantel with some how-we-did-it pictures, you'll want to click HERE


Here's a picture after the plywood "boxes" were added (part 1)


If you remember the last post ended with:
  • the three plywood boxes built as the mantel base
  • the addition of 4x4 posts along both sides of the mantel.
  • the fir boards added on top
  •  and the installation of the wood remnant

Before we nailed the 4x4s I gave the plywood base and each of the 4x4s a quick coat of primer paint.

A quick word about the wood we used:
Even though I planned on painting the mantel ---because of the weathered remnant I was building it around, I decided to use basic  stock wood for the base, so its rougher look would blend better with the remnant once it was painted.
The 4x4s were run through the planer so they were smoother but still had the 'fence post' texture.
The top of the mantel was the only higher quality piece we used.

Once my Dad helped me with the basic structure and rebuilt and attached the wood remnant, our work together was done.  
At this point I was on my own.
After my parents returned home it was time for me to consider the final look of this mantel.

Even though I'd been collecting mantel ideas for this moment (on this Pinterest Board) it wasn't until I saw the wood remnant on  front, that I could finally get an idea of the kind of trim that would work.

I started at the bottom because I knew I wanted six inch trim there. So I bought an 8 inch (wide) pine board and ripped it to a full six inch.
Then came my first mistake.

I forgot to double check these first pieces with a level (until after I nailed them) and even though it was barely off center, I could hear my Dad's voice saying, "If you're gonna do, do-it right. You better pull that off."

Ugh.
I learned my lesson. No more forgetting to check my level.


After a few trips to the molding section of Ganahl lumber and Home Depot, and bringing home a few pieces of fancy molding, I realized that what this mantel needed was simplicity.

There was so much going on with the carved sea shells that every elaborate piece of molding I held up to it seemed to clash. I decided to keep it clean and simple looking.


I had to stop and get a picture of my first-ever 45-angle cut on my miter saw!
All done and ready to paint...woo hoo!!!

I was a bit nervous about how the old wood would 'take' the paint. And truthfully, it was also hard to say goodbye to the weathered finish that I love so much-- in another house I would happily have an entire mantel of this luscious distressed wood.


It just wouldn't work in this home, on this wall.


Gulp.
Good bye old wood, hello painted wood... I'm not sure I like you.

Ok. It took a few coats to penetrate the cracks.
Then more caulking and sanding between coats.

However once it was painted I wasn't completely happy.
After a lot of staring I realized what it was.
I just didn't like the amount of sheen from the semi-gloss.
So I went back to the BM store and picked up the satin finish in the Aura paint line. In case you're wondering the shade is Simply White. 


Call me crazy but I could tell the difference. Much better.
I'm also glad I used the stock wood because when you're next to it, there's a subtle 'imperfect' texture on the wood that's consistent throughout.


It's a fireplace mantel that could've been here for decades, simply painted a fresh coat of white.


BEFORE

DURING
AFTER
While I was at it, I decided to repaint the brick surround with white chalk paint, (so easy with a foam roller) although I still need to get around to painting the rest of the bricks inside the fireplace black.


Hooray....all done!!

In the meantime, my vertical plank project in our downstairs bedroom-soon-to-be-family-room is moving along.
I'll share more on this project soon.


The planks are all up and painted.


And now I'm working on my first bookshelves. (another gulp)

In the meantime... I thank you from the bottom of my heart for stopping by.
xo
Leslie

I'm sharing this post with these friends:
The Scoop
Inspire Me Tuesday
Wow Us Wednesdays


Saturday, August 6, 2016

my biggest DIY project yet!


Hello friends.
 How's your August going? There's been lots happening around here but I wanted to stop in and give you an update on my hardest DIY project to date.
If you remember, when my parents came for their last visit, my Dad and I decided to tackle the final missing piece on our renovated living room wall.
Do you remember the circa 1965 living room wall that was here when we moved in?
A very weird combo of thick rock, tile and sheetrock.


Well --this is what it looked like before the mantel.
(BTW-don't you just love old movies?)
After I finish painting the mantel—this fifteen and half foot wall will be almost done and I promise to share the steps involved in transforming this wall.
But for now I’ll focus on my biggest DIY project to date.
Big for me because:


1.  I’ve never built anything before.
      2.  I’ve never even cut a piece of molding on my miter saw before this project--- but once my Dad left for home--- I was on my own to trim out the entire mantel.


This is the mantel I had in my previous home. I paid a professional to build it.


I'm showing you this because it illustrates how the house you live in really dictates the design of something as creative as a fireplace mantel. I loved the traditional, classic molding I picked for this one, but now that we live in a beach community my vision for this home is very different.

This house is more cottage, with lots of plank walls and rustic touches.
So for my DIY mantel I wanted to incorporate this old wood remnant with its intricately carved seashells.
It was one of those "I have to have it but-have-no-idea-what-I'm-doing-with-it purchases from an antique store years ago.
Here it is lying in my dining room--it's been literally lying around this house since we moved in here.


In my previous home I hung it in our Master bedroom.

And while it looked fine, it wasn't until we moved so close to the beach that I finally 'knew" what to do with it.
Don't you think it would add character to a mantel?

So before my Dad arrived, we had one of our strategic planning sessions over the phone:

Me: “Dad, have you actually ever made a mantel before?”
Dad: “No. But I can make a box, and that’s basically what a mantel is.”
Me: “Hmm… Ok. Sounds good to me.”

Yep, that’s basically our DIY attitude in a nutshell.  
Although I do have to confess that my Dad –age 75—didn’t retire from his rigorous sheetrock job—until he was sixty, and along the way he’s renovated his entire home by himself with skills that he explains away with four simple words,
“It’s just common sense.”

That’s my Dad.


The first question I had to deal with was the size of this mantel. 


After a lot of measuring and a lot of staring at the wall, I decided to keep as much of the white painted bricks visible as possible, and I sketched out a picture for my Dad after we got our measurements.

I still had no idea about the final look, what kind of molding I wanted etc...
All I knew was that I was designing it around this piece of old wood that I hoped we could cut into without it falling apart.
We headed to Home Depot and the local lumber yard and returned with a sheet of quarter inch plywood and 1x4s to build the frame.
My Dad was right. We basically built three boxes. One on top. And two skinny sides.
First things first. Finding the center of the fireplace for a 2x4 that we would use to attach our mantel. I watched him drill the cement screws into the brick because I was too chicken to drill into my pretty bricks. In my view, there was no room for mistakes.
"Dad, aren't you nervous drilling into brick?"
"Oh come on. What's to be nervous about?"
One important design decision was figuring out the space for the top of the mantel. We have the sliding barn doors above that made the final measurements crucial. Can you see the crack where the brick ends?
At this point I was still thinking of only one thick piece of wood for the top.
Here's a picture of the side frame being checked for snugness. Our level was constantly with us.

Since the brick stuck out from the wall, it left a gap between the box and the wall at the ends.

So we added a piece of wood to close the gap behind the 'box' for easy attachment.  

This gap also meant the bottom and top pieces of the frame had to be notched around the brick.
I left that for my Dad.

To strengthen the 'frame' for our main box we used pieces of 1x4s.
Once it was ready, we slipped the first plywood box over this frame and secured it with screws and nails

We went through the same process for the sides.

We added plywood pieces underneath and to the sides of the boxes to add size and give it cleaner base for the paint and molding to follow.
If you notice, I decided to use rougher wood pieces because of the weathered remnant I was using.
Even though I would be painting everything white, I wanted the old textured wood to (hopefully) blend with the 'new' wood once painted.

Which brings me to the wood remnant and the practicality of using it on our mantel. As we discovered, it was REALLY old wood. And someone had pieced it together on an uneven plank that we had to dismantle in order to cut and fit it for our mantel. 
It meant we had to rebuild it on a new piece of plywood so we could install it on the front of our 'box.'
My Dad was amazingly patient handling the delicate pieces and he's the one who put it together again. I helped him realign the carved seashells but it's weird how maternal (yep-that's the word) I felt about this old wood. I actually cringed when he cut into it with the table saw.
(excuse the dark IPhone pictures)

We had to remove a big dent out of the middle and reattach it. Here's a photo before it was in one piece again--I had primed the plywood and we already installed a pine top-and I wanted to see the remnant size against the box.
Remember, I still had no idea how I was going to trim it out, and if you've ever gone to the molding/wood section of a lumber yard or Home Depot, you know what I was facing.
But that's the last step.

Once we attached the remnant we were still dealing with the construction part. And there was a space at both ends where the remnant ended. 
After a lot of staring at the empty space and looking at trim options, Jim walked in and asked us why we just didn't run a 4x4 all the way along the sides.
Bam! That was the answer.
Are you starting to see a mantel here?
We also solved another problem along the way.
Remember the gap on top where the bricks end? Well we still had a glimpse of the gap showing even after we attached the simple pine top.
What to do?
We measured again and found room for another piece of wood on top. Ta daaaaa!!!
After this picture there was a lot of sanding and caulking and filling nail holes. But I won't bore you with all those details,  and if you're still reading along I thank you.
Next time I'll show you my first-ever molding job that I tackled after my Dad left.
I'm happy to say that this DIY mantel is done and waiting for a final coat of paint.
And I can't wait to show you!
xo
Leslie


Related Posts Plugin for WordPress, Blogger...