Pages

Wednesday, May 25, 2016

Our Classic Cottage Bedroom Reveal


Hello friends.

Today I decided it was finally time to share some updated pictures with you, so I bought some fresh flowers for this bedroom.... and here we go.
It feels like it's been forever since I started working on our master bedroom.
May has been an interesting month, lots of overcast days here by the beach, in addition to some stressful 'life' stuff I've been distracted by--- all of which adds up to a feeling of needing to go slower. Be easier with myself. Somehow (thankfully) I've managed to finish this bedroom despite my roving attention and it feels good to check this room off. 

Even though I expect a few more changes to come, at least for now the basics are done.

First let me give you an update on a few of my decisions.

Remember these two sets of mirrored doors that almost ran the entire length of our 18 foot wall?
The mirrors were the first thing you saw when you entered the room.


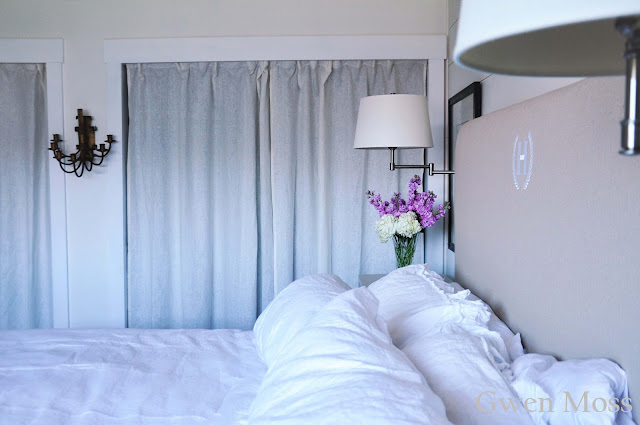
And now..... this is what you see when you step in the room.
Ok. So what happened with those sliding mirrored doors?
Well, after a lot of agonizing and googling ideas on updating mirrored doors with wood trim and paint,  I decided to go with my heart.  Once they were removed I just didn't have the energy to update them because the truth is, I just didn't want mirrored closet doors in this room.

And since we plan on consolidating these two little closets for one large walk-in at a later date... why not get rid of the doors now?

So once I framed out the closet openings I headed to Ikea where I bought two sets of white wood rods and white linen curtains.
And I have to say, once I cut the rods to size and put up the curtains it completely changed the entire vibe inside this room.
All this hanging white linen adds a ethereal lightness to the room now.
Or has the hubby says, "it feels more beachy now."
Tackling this room on a budget meant lots of painting. This included repainting both nightstands in SW Downing Sand and SW Dover White.

Before: TV Wall

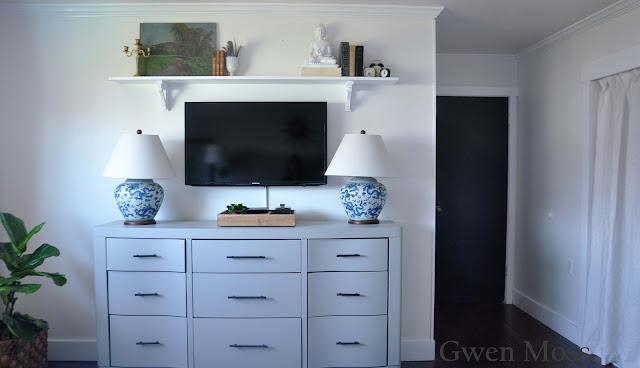
Here's our TV wall right after it was painted in Farrell and Ball's Wimborne White.
Notice that dark wood dresser.


After: TV Wall
I painted this dresser in SW's Dorian Gray and replaced the hardware for an updated look.
These matching lamps were previously on our bedside tables but I replaced them with new lighting fixtures when I made the monogrammed headboard.


So far these Pottery Barn wall sconces- are perfect for reading in bed.

I made this new shelf using simple wood brackets and a ten inch wide plank from Home Depot that I painted in bright white. I think it adds interest and symmetry to an otherwise blah wall.
Notice those TV wires? They're (mostly) gone now.


Underneath the TV is a wood tray that hides the remote and TV receiver.
My original wish for this wall was No Wires Showing. I wanted all the TV wires to run behind the wall and even bought a kit from Lowe's that made cutting the holes easy
( we actually didn't need it)

 and once we ran the main wire behind the wall I realized I still had this one receiver wire that would be visible! 
I was bummed, but I put it inside one of those plastic wire covers and pretty much accepted it.

One of the first things I did when we moved into this house was replace all the  flimsy, old blinds with bamboo shades...
Before-Window Wall
After-Window Wall
---with new baseboards, window casing and curtains.

I added this trim to the pair of lined linen curtains I had stored away from my previous house. Thanks to Marty who let me know that Hobby Lobby has a good selection of affortable fabrics and trim there.

What I like most about our new lighting is that it allows us to have more space on top the night stands, although right now we're trying to keep them clutter free.
It feels much more restful and calming in here.


Well that's it. In case you're interested, here's how I put this room together.

Master Bedroom Budget Friendly Makeover

DIY monogrammed headboard : $155
breakdown:
plywood- $25;
foam, batting, and adhesive $52
fabric-3 yards @ $12 each=$36
monogram stitching $42
legs on headboard; one 2x4  (already had)

sisal rug: consignment store
vintage mirror over headboard: own
Botanical Prints behind night stands: consignment store
nightstands and dresser: own
bedding: own
bedskirt: fabric remnant cut into long strips & held with Velcro: $19
2 Pottery Barn Chelsea Swing Arm wall sconces: $276
shelf and wood brackets: under $25
misc books and art on shelf: own
2 wood trays- from HomeGoods $14.99 and $16.99
plant basket: thrift store $10

Whew, I think that's it. Let me know if you have any questions.
And thank you so much for following along on my little makeover.  I always appreciate hearing your ideas and opinions.
xo

Leslie

Share  your Cup
Thoughts of Home on Thursdays
Feathered Nest Friday

Tuesday, May 10, 2016

It's done!! How I made my upholstered monogrammed headboard


Well, my new monogrammed headboard is done and I love how it turned out.

If you’re new here let me remind you.


Here is the old, metal headboard we had forever. Nothing wrong with it. But since I was finally giving our poor, neglected master bedroom a make-over, I decided to include a new upholstered headboard that I could make myself.

Just to recap, so far my Classic Cottage Bedroom make-over has included:

1.     Painting the entire space with Farrell and Ball Wimborne White

2.    Adding plank walls, new baseboards and window trim

3.    Re-painting the two nightstands and dresser

4.    Adding linen curtains (from our old house), bamboo blinds and new lighting.

5.    Re-styling our ugly TV wall by adding a new shelf

Whew. Now I know why I’m still not finished, that’s a lot of DIY work isn’t it?

Anyway, back to my FINISHED headboard (woo-hoo!)

Since there’s lots of wonderful tutorials all over blogland on DIY upholstered headboards, I don’t have much to add, --but I will share a few things I learned along the way.

Tufted or Not?
The first thing I did before buying my piece of plywood was deciding on the design/and fabric for my headboard. You can see my fabric tip HERE. I wasn’t sure I wanted a tufted headboard because we like to read in bed and I was looking forward to finally leaning against something soft and comfortable.

Except.  I really like the look of a tufted headboard. So…what to do?

Well, my indecision was all for naught because when I asked Mr. Moss his answer was swift and definitive.

“I hate those tufted headboards,” he said.

(“Hate?” Really?  Hmm. I didn’t even know you knew what ‘tufted’ looked like but ok.)

Since he’s usually so unaware  easy-going about my decorating decisions I definitely wanted to go with his opinion. And it didn’t hurt that it would be so much simpler to make too.

After reading a few tutorials online, I got my measurements for the new headboard by using our current metal one that was still attached. It was basically the same measurements minus the curve.

I took the measurements to Home Depot and had one of the guys cut my dimensions from a piece of half inch plywood.

deciding on foam

However when it came to pick my foam I decided to go rogue. 

After reading the post HERE and visiting our local Walmart I felt uneasy about using the foam mattress recommended as a cheaper option. I really wanted a clean look and since I wasn’t tufting--is that a word?-- the headboard I worried that using a mattress might look lumpy in spots. Plus I was saving so much money making it I decided to use the foam sold at the fabric stores, and cut it to my own dimensions.

But before paying full-price for the foam at Joann’s Fabrics I decided to Google Foam and Fabric stores and at the last minute found a place that would cut my foam with their giant machine. It ended up being a big warehouse that was 30 minutes (drive time) away but the prices were so cheap. Plus—I wouldn’t have to go through the headache of cutting through all that foam.
(Plus--I live in SoCal remember? So I'm used to long drives).


I ended up buying a high quality density foam, along with all the batting plus a can of adhesive (recommended for a professional job) ...everything for only fifty bucks!!


Despite the drive time, I was happy. I got great foam with clean, neat edges.  

The rest of the process was pretty similar to the other tutorials.

The monogram

Except for one detail I added to my headboard: the monogram

I decided to add it because I felt like my non-tufted linen-look headboard needed something to make it special. And no, I did NOT embroider this myself.

Here’s another easy thing I did. I found a local store that embroidered logos for businesses and sports teams and told them what I wanted to do. After browsing their catalog i found what i was looking for:

A monogramed letter with a classic laurel wreath and THIS STORE couldn’t have been more helpful. After deciding on the size monogram I wanted on my headboard, they printed the pattern out and I took it home.


Once I unrolled my fabric, I positioned the pattern where I wanted the monogram to go—basically deciding on the distance of the monogram from the top of the headboard---and I used painter’s tape to place the pattern on the fabric.

When I took it back to the shop the owner unrolled the fabric -looked it over, and gave me a thumbs up and one week later I picked up my monogrammed fabric.

Stapling the fabric to the plywood


Once I wrapped the plywood with foam and batting I stapled it around the plywood, careful to pull it tight and smooth. I DO think the spray adhesive helped although I didn't read a tutorial that mentioned using it. 

Next came the fabric.

When it came time to staple the fabric onto the plywood, I had to measure and find the center of the headboard and line up the monogram before I began to staple.


I used tape on the back of the plywood to keep the monogram in position while I began to staple. I know a lot of tutorials recommend being on top the plywood as you staple and pull the fabric, but because of the monogram I kept the headboard mostly upright for the initial stapling. I wanted to make sure it stayed in place.


Then, once the top was secure I ended up putting it face down while I finished the stapling. I found it really helpful to keep checking the front of the headboard to make sure the fabric was being pulled nice and flat.

Attaching the headboard to the bed frame

When it was finished we simply attached it to our bed frame by lining up our "legs" which were actually 2x4 pieces I had cut with my miter saw.

It definitely takes two people the way we did it. I wanted to attach the legs first so I could decide on the height of the headboard by looking at it against the plank wall.

This meant using a level on  the top before we screwed anything together.

Here's another picture with the new linen pillow shams I just bought:


I really love the finished look, I think the monogram on the headboard adds a lot of bang for the buck! ($42)


Just for fun, here's the BEFORE shot:

And here's the AFTER:


Well, that’s pretty much it. Lots of common sense stuff but I hope it helps if you’re thinking of making your own headboard. I always say, if I can do it, you can too---and I mean that.

Stay tuned for this room's final reveal ---I've got more details to share in this room…it’s almost done. I’m just working on those mirrored closet doors now.

Also---I may be the last blogger to do it, but I'm finally on Instagram now as Gwenmossblog---I just activated my old account so you can follow my updates there too.

Thank you so much for following along...
peace and love
xo

Leslie

I'm sharing this post with friends:

The Scoop #222
Inspire Me Tuesday
Inspire Me Monday
Be Inspired #208
Making Broken Beautiful
Thoughts of Home on Thursday


Tuesday, May 3, 2016

thoughts on slowing down...


This is a true story. 

It happened in the Washington DC Metro Station in 2007.

A man was sitting amid the fast-moving crowds in the station, playing his violin. During the time he was playing approximately 2000 people went through the station, unaware that this man was actually Joshua Bell, one of the greatest musicians in the world, filling the air with six glorious and intricate Bach pieces on a violin worth 3.5 million dollars.

Although people typically paid hundreds of dollars for a seat inside a theater to listen to this man, on this day he was incognito, part of a Washington Post social experiment to find out how we experience everyday beauty in our lives.

This is what happened. During the forty-five minutes that Joshua Bell played his violin only six people stopped to listen. 

Several children were drawn to the musician, but were quickly pulled away by their parents.

And afterward it raised an important question.

If we don't have 

a moment 

to stop and listen 

to one of the most gifted musicians in the 
world ....

How much do we miss when we’re rushing from one place to another?

How much everyday beauty
do you actually ’see’?


Would you have been one of those six people who witnessed something so startlingly unique and beautiful in the middle of a chaotic morning that you stopped what you were doing to enjoy it?

I'm just asking.

Because the truth is, I am both; I am one of those six people who walks around with open eyes and is willing to stop and relish spontaneous moments of beauty in my surroundings.


But I'm also one of those hurried bodies running toward a place I need to be, completely distracted by my latest list of things to do playing out in my head.

I am both of these people.

I know what it's like to be fully awake and connected to my body, to lay with my forehead pressed into my yoga mat, and with my eyes closed, surrender to the slow, synchronized rhythms of my breath so that for a few mere moments, there is nothing else that in the universe except the sound of Prana-life's energy flowing in my ears.

I'm here for my sadness. My worries. My excitement. My dreams.

I feel the changing seasons on my skin.

And I know my age.

Yet I also know what it’s like when I'm simply going through the motions. When my body is one place but my mind is somewhere else, rapidly flitting from one thing to another, planning, worrying, regretting, Googling, and scheduling. 

I know what it's like to be driving in my car, so deep in thought that I suddenly shake my head and realize there are entire swaths of streets, brightly colored signs, and tanned people in swim suits riding bikes on the sidewalk, that I had passed without truly seeing.
 
Buddhists refer to these times as a kind of disembodied living; it's when we cease to be fully present in our body because we're swept away by our cluttered, roving mind.

Instead of being fully awake in The Present Moment 
–aware, with all our senses---
 there is an incessant dialogue going on in our heads where we're figuring things out. Maybe we're stuck in the past (regretting, re-grieving, re-living) or in the future (worrying and planning the things that might happen). But to the degree that our minds are moving 100 miles an hour, we’re not fully in our bodies. We’re not really present for the only life we have,
 which is happening right now.

Hmm…when did we glorify multi-tasking?

Do you remember?


 Favorite ways to slow myself down

Get out into Nature.
Keep a journal. 
Practice Mindfulness 
Practice Yoga.
Make time for solitude
Do something creative


can you relate to this post?

xo
Leslie
 
 
Part Two: Living fully--begins in our body


Related Posts Plugin for WordPress, Blogger...